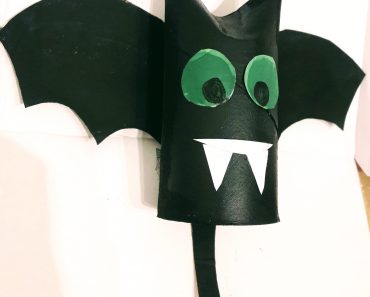
With Halloween coming nearer, we thought it was time to get making some spooky toilet paper roll bats for the scary season. These toilet paper roll bats are simple and easy to make and great for toddlers to school aged kids. You can make the toilet paper roll bat in five easy steps.
What You Need To Make Your Toilet Paper Roll Bat
- a toilet paper roll
- Black construction paper
- 2 stick on craft eyes
- scissors
- glue/tape ( whichever you prefer)
- markers or crayons
- black paint (optional)
- string (optional)
Create your own paper roll bat: 5 easy steps
Step 1
Measure the width of the toilet paper roll against and cut out enough black construction paper to cover the roll. Using glue or tape fasten the black paper to cover the roll all the way around.
Step 2
Cutout one piece of paper shaped like two even size wings using the black construction paper and scissors. You can decorate with marker/glitter/crayon if you like.
Tape/ glue the wings to one side of the standing toilet roll. The opposite side will be the face.
Step 3
Glue on eyes near the top of the standing roll. Using marker or crayons you can draw on a face( mouth etc).
Step 4
Using scissors and construction paper, cut out two small triangles( approx 2cm). These will be the bats ears. Glue/tape them on to the top of the standing roll.
Step 5
Fly that awesome little bat around. As an option you can alway attach some string near to top so it can be hung.
Photo credit : Buggyandbuddy