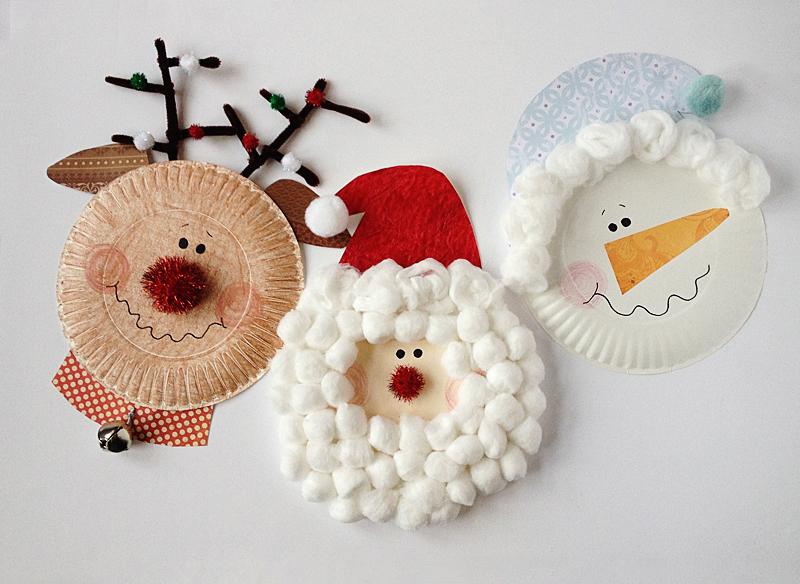
Rudolph, Santa and Snowman crafts
Christmas is almost here, and what better way to get in the spirit. Here are three simple and easy Christmas crafts for kids. Santa craft, Rudolph craft and snowman craft.
You will need
3x Paper Plates
Cotton balls
Crayons
Markers
Scissors
Pom poms – red, green and white
Construction paper of your choice – for Santa and snowman’s hats, and Rudolph’s collar and ears
Bell (optional)
Glue or tape
Brown or black Pipecleaners
Rudolph
Step 1
We will start with Rudolph. Using crayon color the paper plate brown. You can color two red or pink cheeks too. Using marker draw some eyes and a mouth.
Step 2
Cut out two small ears from the construction paper you have chosen. On the opposite side to what you have colored, tape or glue on the ears near to top.
Step 3
On the same side that the ears are stuck on, you will then stick on two pipe cleaners. These will be the antlers, so you can twist them and shape them to look like reindeer antlers. Once the antlers are attached, flip over the plate, so you are now looking at Rudolph ‘s face. Glue or tape on a red shiny pom pom for his nose. You can also decorate the antlers with pom poms.
Step 4
Rudolph needs a bell! Cut out a rectangle that will fit at the baseRudolph’s face, to become a collar. Its should be approximately 10cm long x 2-3cm wide. Glue or tape this to the back side of the plate. If you have a bell, stick it in the middle of the collar.
You now have an awesome paper plate Rudolph craft!
Santa
Step 1
Using a light brown or beige crayon, color the paper plate. This is Santas face. Once the plate is covered, use a marker to draw on 2 eyes. Using a pink or light red crayon, color two circles to become Santa’s cheeks.
Step 2
On the paper plate, you need to stick on the cotton balls around the outside edge. Once the first layer is completed, continue another layer inside the first layer. Repeat again until there are three layers of cotton balls. Make sure not to cover the eyes and cheeks. This is Santa’s hair and beard.
Step 3
Santa needs a red hat. Using scissors cut out the shape of a hat. On the back side of the plate, glue or tape this close to the top or Santa’s head. Turn Santa back over. Now glue on the pom pom or cotton ball at the end of Santas hat.
Step 4
Glue on a red pom pom for Santas nose, and Ho Ho Ho, away he goes. Santa is ready for Christmas!
Snowman
Step 1
On the plate, you will need to glue or tape on cotton balls at the edge. Make sure to do it only on the top half of the plate.
Step 2
Using a marker, draw on the Snowman’s eyes and mouth. Using a pink crayon, draw and color in a circle on the left side of the mouth. This will be the cheek.
Step 3
Cut out a triangle for the Snowman’s nose from orange construction paper. If you don’t have orange, use white, and color orange with marker or crayons. Glue or stick this above the snowman’s mouth.
Step 4
Snowman’s hat. Cut out a hat shape from construction paper of your choice. The same shape as Santa’s hat will be great. On the back side of the plate, glue or tape at the top, above the snowman’s eyes. Stick on a pom pom at the end of the hat. Snowman is ready for sledding!
Merry Christmas Everyone xx
Photo credit – Pixcereal.com